Any Unreal Engine Experts Here?

Huntn

Whatwerewe talk'n about?
Site Donor
Posts
5,291
Reaction score
5,235
Location
The Misty Mountains
I watched some of that video, and realized it might be a little too advanced for you. You need something more foundational. Like this...


Thanks for the tutorial link! I'm switching back and forth. between UE and Blender. Finished the shoe, then jumped back into a UE terrain tutorial.
Indepth Look at Enivronmental Artist based tools: https://learn.unrealengine.com/course/3765504/

I'm feeling real mental pressure to start laying out a project in UE, just because I want to see something start happening. No I'm not in a a rush. :)

I've already experimented with UE terrain and ended up with something much larger than I want for my first project, but I like what I see. However, I've posted a question at the Epic Learning forums about: for an intimate scene, that runs off into distant vistas, where the player is limited to the immediate scene, would it be better to try to work with soley UE terrain, or do like the Forest Road guy did and import an irregular plain into UE for the close up areas and then surround that with UE terrain that falls away. Waiting to see what the UE crowd says about that. If you have an opinion I'd be interested in hearing it.

As far as UV mapping, I may very well be able to get away with not doing that at the beginning, and there is a ton of other stuff to learn first. UE Materials are a ball buster to get a complete handle on them. And I've realized that terrain is a big part of what I'm trying to build. For example I build a pond, put some water in it, a rocky outface, a cave, a waterfall, I see no need for UV mapping there, or do I need it? All the trees, shrubs, grasses, including some big rocks are available though megascans with textures included.

Now lets say I want to build a barn/outbuilding with standard wood/ metal pieces or a swinging bridge. UV mapping there or just slap a material onto the pieces? I figure I'll need to know about a blueprint to give a swinging bridge sway. I'll need to learn about water, flowing water, and falling water. I also mentioned tree trunks (bark on or maybe off) as possibly part of construction in a building, and I imagine I can find a wood/bark texture already UV mapped for me that would suffice for this purpose.

Not saying I don't want to do UV mapping, just want to hit it at a logical point, when it becomes necessary.

A recent project you worked on, the beautiful pickup truck. :) You design the pieces for the hood and the fenders, does that require you to UV map it or can you simply slap a material onto it?

Thoughts? :D
 

Renzatic

Egg Nog King of the Eastern Seaboard
Posts
3,908
Reaction score
6,840
Location
Dinosaurs
It all depends on what you're doing. If you're wanting to get into really fine, superbly detailed objects, then yeah, you're going to have to UV map. If you're working with low poly, flat shaded stuff, a'la the asset pack you recently downloaded, then basic materials will do you fine, since you're not really worry about anything except color.

But say you're building a low poly sign for a grocery store. You have the shapes and colors down, but you want to add a logo in there. You could try and do a triplanar projection, but it ends up look sloppy, and you have no real control over it. If you want to add your logo on there, you're going to have to UV map the part of your model that's housing it, and paste the resulting UV island over the image in your UV editor.

I'll make a video for you better illustrating this.

Also, the truck I made has different colored materials for its various parts. I've UV mapped half of it, but I've been wanting to experiment with shaders and colors, so it's really just solid colors with some fancy effects layered on top.
 

Huntn

Whatwerewe talk'n about?
Site Donor
Posts
5,291
Reaction score
5,235
Location
The Misty Mountains
It all depends on what you're doing. If you're wanting to get into really fine, superbly detailed objects, then yeah, you're going to have to UV map. If you're working with low poly, flat shaded stuff, a'la the asset pack you recently downloaded, then basic materials will do you fine, since you're not really worry about anything except color.

But say you're building a low poly sign for a grocery store. You have the shapes and colors down, but you want to add a logo in there. You could try and do a triplanar projection, but it ends up look sloppy, and you have no real control over it. If you want to add your logo on there, you're going to have to UV map the part of your model that's housing it, and paste the resulting UV island over the image in your UV editor.

I'll make a video for you better illustrating this.

Also, the truck I made has different colored materials for its various parts. I've UV mapped half of it, but I've been wanting to experiment with shaders and colors, so it's really just solid colors with some fancy effects layered on top.
I’ve admit I’ve been working with so much stuff where the textures are already available that I’ve not been focused on UV mapping. I’ve even swapped Textures between different plants and have not noticed a real difference and you think I would have.

And in the modeling I’ve been doing in the Blender tutorial, at most he has slapped some colors not textures. I’m hoping he gets into UV mapping soon.

Would you say it’s a complicated, or highly technical procedure?

I know, you are taking a mesh and flattening it to paint the texture on. Maybe I need to watch one of those link you posted. Don’t take this as me blowing your suggestions off. If I have to do UV mapping to model, I need to be interested, and I am interested. Have not got around to it yet because of other stuff. I figure the Blender tutorial at some point will breach this topic.
 

Renzatic

Egg Nog King of the Eastern Seaboard
Posts
3,908
Reaction score
6,840
Location
Dinosaurs
Would you say it’s a complicated, or highly technical procedure?

Once you understand where to best place your seams, know how something will look when you unwrap it, and get your head around the ebb and flow of things, it becomes mostly busywork. It's the necessary process that bridges the two fun parts of 3D modeling.

At worst, you can expect a good hour and a half of marking seams, rotating islands, and packing your UV space for a complicated model. It's not difficult at all, but it can be a drag.

...and on that note, my video just finished uploading. I'll do a quick write-up explaining what's going on, and post it your way here in a second.
 

Renzatic

Egg Nog King of the Eastern Seaboard
Posts
3,908
Reaction score
6,840
Location
Dinosaurs
READ THIS BEFORE WATCHING THE VIDEO!

What I'm doing is taking two parts of my little sign model, the little bulby part, and the metal ring around it, and unwrapping them.

The bulby part is easy. It's just a hemisphere, with no other connecting parts. It'll unwrap and spread itself out without having to mark any seams. I just select the faces, hit U, and unwrap it. The end result gives me two hemispheres, the front and back bulby parts, which I lay on top of each other, giving them both the same texture space, and align it (fairly badly) over the logo I downloaded.

The ring is a little more complicated. Since it has various dips and bobs in there, doing a straight unwrap might look fairly decent, but it's sloppy, with plenty of faces stretched out of proportion (I really should have used a grid texture to illustrate this, since they're good both for determining texel density, and face stretching). What I did was just add a seam along that bottom most loop, and allowed Blender to unfold it all from there, making a rectangular shape. I did a quick Follow Active Quads command to align it all out, since the unwrapping process does occasionally give you some bendy bits.

From there, I just aligned, and moved the resulting island around. I should've also scaled it up and down a bit, now that I think about it.

In the end, all you're doing when you're UV mapping is just cutting your object into little pieces, in a way so that they flatten out smoothly without any pinching or stretching, then telling that surface where to sit in UV space, which is basically a fancy way of saying "the coordinates where your surfaces sit on a 2D picture plane.

As you can tell, there are some things I wish I did in retrospect, but it's a good primer, I guess.


Huntn

Whatwerewe talk'n about?
Site Donor
Posts
5,291
Reaction score
5,235
Location
The Misty Mountains
@Renzatic
I'm working this tutorial. At 1 hr 5min, he is making a handle for a coffee cup.


  • Everything with the cup has gone fine till now.
  • He selects a face where the handle will emerge from on the side of the cup.
  • He applies the spin tool but what I see on the face of the cup where the handle will pop out is a distinct circle superimposed on this rectangular face.
He does not mention adding a circle. I tried watching his key stokes to see why there is now a circle showing in that quad. I was thinking that maybe by virtue of smooth shading it was there, but his handle has that circle drawn on the face, but mine does not, with or without shade soothing on. I also looked for a control associated with the Spin Tool to see if there is a setting for circles, but don't see it.

And what he extrudes is circular. If I try to extrude this quad out with shade smooth turned on, it looks like a rectangle with the edges beveled.

Can you by chance tell what he did and describe it? I can't imagine it being the difficult.
Thanks! :)
 

Huntn

Whatwerewe talk'n about?
Site Donor
Posts
5,291
Reaction score
5,235
Location
The Misty Mountains
READ THIS BEFORE WATCHING THE VIDEO!

What I'm doing is taking two parts of my little sign model, the little bulby part, and the metal ring around it, and unwrapping them.

The bulby part is easy. It's just a hemisphere, with no other connecting parts. It'll unwrap and spread itself out without having to mark any seams. I just select the faces, hit U, and unwrap it. The end result gives me two hemispheres, the front and back bulby parts, which I lay on top of each other, giving them both the same texture space, and align it (fairly badly) over the logo I downloaded.

The ring is a little more complicated. Since it has various dips and bobs in there, doing a straight unwrap might look fairly decent, but it's sloppy, with plenty of faces stretched out of proportion (I really should have used a grid texture to illustrate this, since they're good both for determining texel density, and face stretching). What I did was just add a seam along that bottom most loop, and allowed Blender to unfold it all from there, making a rectangular shape. I did a quick Follow Active Quads command to align it all out, since the unwrapping process does occasionally give you some bendy bits.

From there, I just aligned, and moved the resulting island around. I should've also scaled it up and down a bit, now that I think about it.

In the end, all you're doing when you're UV mapping is just cutting your object into little pieces, in a way so that they flatten out smoothly without any pinching or stretching, then telling that surface where to sit in UV space, which is basically a fancy way of saying "the coordinates where your surfaces sit on a 2D picture plane.

As you can tell, there are some things I wish I did in retrospect, but it's a good primer, I guess.


I'll read and watch this and then get back with you tomorrow. Thanks much! :)
 

Renzatic

Egg Nog King of the Eastern Seaboard
Posts
3,908
Reaction score
6,840
Location
Dinosaurs
  • Everything with the cup has gone fine till now.
  • He selects a face where the handle will emerge from on the side of the cup.
  • He applies the spin tool but what I see on the face of the cup where the handle will pop out is a distinct circle superimposed on this rectangular face.

He's holding down the left mouse button on one of the Spin Tool handles, which creates a tiny bit of geometry that's circularized by the Subdivision Surface modifier. If you let go of the left mouse button, it extrudes and spins the selected face 180 degrees, like you'd expect.

Though I rarely ever use the spin tool. I'd recommend doing it like this, extruding your faces, rotating them with R, then using a bridge edge loop to join the bits together. Like so...


If you want to refine the shape, just add in more geometry with loop cuts, then rotate and position it.
 

Huntn

Whatwerewe talk'n about?
Site Donor
Posts
5,291
Reaction score
5,235
Location
The Misty Mountains
He's holding down the left mouse button on one of the Spin Tool handles, which creates a tiny bit of geometry that's circularized by the Subdivision Surface modifier. If you let go of the left mouse button, it extrudes and spins the selected face 180 degrees, like you'd expect.

Though I rarely ever use the spin tool. I'd recommend doing it like this, extruding your faces, rotating them with R, then using a bridge edge loop to join the bits together. Like so...


If you want to refine the shape, just add in more geometry with loop cuts, then rotate and position it.

At the beginning where you select a quad, you get a circular menu, is that holding the left mouse button Where you select “geometry“? The author does not explain that. I’ll try this.Thanks :)!

@Renzatic added a question to this post.
 
Last edited:

Huntn

Whatwerewe talk'n about?
Site Donor
Posts
5,291
Reaction score
5,235
Location
The Misty Mountains
READ THIS BEFORE WATCHING THE VIDEO!

What I'm doing is taking two parts of my little sign model, the little bulby part, and the metal ring around it, and unwrapping them.

The bulby part is easy. It's just a hemisphere, with no other connecting parts. It'll unwrap and spread itself out without having to mark any seams. I just select the faces, hit U, and unwrap it. The end result gives me two hemispheres, the front and back bulby parts, which I lay on top of each other, giving them both the same texture space, and align it (fairly badly) over the logo I downloaded.

The ring is a little more complicated. Since it has various dips and bobs in there, doing a straight unwrap might look fairly decent, but it's sloppy, with plenty of faces stretched out of proportion (I really should have used a grid texture to illustrate this, since they're good both for determining texel density, and face stretching). What I did was just add a seam along that bottom most loop, and allowed Blender to unfold it all from there, making a rectangular shape. I did a quick Follow Active Quads command to align it all out, since the unwrapping process does occasionally give you some bendy bits.

From there, I just aligned, and moved the resulting island around. I should've also scaled it up and down a bit, now that I think about it.

In the end, all you're doing when you're UV mapping is just cutting your object into little pieces, in a way so that they flatten out smoothly without any pinching or stretching, then telling that surface where to sit in UV space, which is basically a fancy way of saying "the coordinates where your surfaces sit on a 2D picture plane.

As you can tell, there are some things I wish I did in retrospect, but it's a good primer, I guess.


Ok, holy carp… :) What is that part where you are connecting nodes? Is that buried in the resulting texture?

Akso I’m hoping the Blender tutorial guy gets around to this aspect of UV mapping.
 
Last edited:

Renzatic

Egg Nog King of the Eastern Seaboard
Posts
3,908
Reaction score
6,840
Location
Dinosaurs
And what he extrudes is circular. If I try to extrude this quad out with shade smooth turned on, it looks like a rectangle with the edges beveled.

Gimme a quick screenshot, because there are a few things that could be your problem here.
 

Renzatic

Egg Nog King of the Eastern Seaboard
Posts
3,908
Reaction score
6,840
Location
Dinosaurs
Ok, holy carp… :) What is that part where you are connecting nodes? Is that buried in the resulting texture?

That's your material in the shader editor. I'm attaching an image node to the Principled BSDF node.

Akso I’m hoping the Blender tutorial guy gets around to this aspect of UV mapping.

He does. It's in Day 4.
 

Huntn

Whatwerewe talk'n about?
Site Donor
Posts
5,291
Reaction score
5,235
Location
The Misty Mountains
Tonight I just finished the UE Indepth Look at Environmental Artist based tools section of Bump Offset and Parallax Occlusion Mapping: https://learn.unrealengine.com/course/3765504

This shows how to add height maps to meshes without adding geometry. Of high interest. I included the link but you probably just can't click on it and see it.

I'll suppose Blender has something similar based on height maps, but the real question is these things require functionality coming from materials in UE so I'm going to assume for the purpose of UE that I should maybe prepare textures in Blender such as channel packing, and creating height map textures, but as far as actual implementation, that would be via UE materials. But Blender would have to have the equivalent in whatever they use as an alternative to materials for output in Blender.
 

Huntn

Whatwerewe talk'n about?
Site Donor
Posts
5,291
Reaction score
5,235
Location
The Misty Mountains
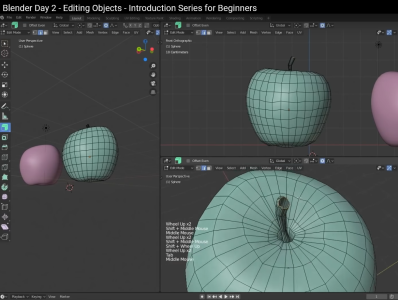
@Renzatic, I'm about 1:17 in the Blender Day 2 tutorial, and the guy is making an apple. One thing I'm noticing as he gets more advanced, he's not talking about his key strokes and when it comes to making organic shape I've not been able to follow along. At one point in the previous section when he was making headphones, most of that went ok until he started extruding the wire about 1:14, he was extruding wire by clicking in space and the wired seemed to extude, following along. Now in the apple, he is making the stem and looking at the keys I see displayed, the stem is not happening. As he extrudes it the direction and thickness of the shape changes. B

I may just have to go find a blender tutorial on organic shapes... :unsure:

blender day 2 apple stem.PNG


Last edited:

Renzatic

Egg Nog King of the Eastern Seaboard
Posts
3,908
Reaction score
6,840
Location
Dinosaurs
I may just have to go find a blender tutorial on organic shapes... :unsure:

Nah, he's just doing the basics, but he's going through it quickly. Like when he deletes the faces for what will eventually become the stem, he loop selects the resulting hole, hits E to extrude, S to scale, left-clicks to end the operation, E to extrude, Z to lock it down to that axis, and so on and so on. He's just iterating through it all quickly, which can be confusing if you're still on shaky legs with the program.

Also, he extrudes with a simple Ctrl-Right Mouse Click. You select an edge or face you want to extrude, and do that for it to instant extrude your selection out to where your mouse cursor is hovering.

Oh, and Blender doesn't have direct support for Parallax maps. There are a few plugins you can buy, but they're complicated to use.

Really though, you won't be using parallax maps on most of your models. They're better fit for surfaces with tons of small details that would just be too complex to do with raw polygons, like gravel, cobblestone walkways, or things like that. You want to use them sparingly, because they're fairly expensive to calculate.

Also, sorry for taking so long to get back to you. I meant to respond to you yesterday, but got sidetracked by a videogame. :p
 

Huntn

Whatwerewe talk'n about?
Site Donor
Posts
5,291
Reaction score
5,235
Location
The Misty Mountains
Nah, he's just doing the basics, but he's going through it quickly. Like when he deletes the faces for what will eventually become the stem, he loop selects the resulting hole, hits E to extrude, S to scale, left-clicks to end the operation, E to extrude, Z to lock it down to that axis, and so on and so on. He's just iterating through it all quickly, which can be confusing if you're still on shaky legs with the program.

Also, he extrudes with a simple Ctrl-Right Mouse Click. You select an edge or face you want to extrude, and do that for it to instant extrude your selection out to where your mouse cursor is hovering.

Oh, and Blender doesn't have direct support for Parallax maps. There are a few plugins you can buy, but they're complicated to use.

Really though, you won't be using parallax maps on most of your models. They're better fit for surfaces with tons of small details that would just be too complex to do with raw polygons, like gravel, cobblestone walkways, or things like that. You want to use them sparingly, because they're fairly expensive to calculate.

Also, sorry for taking so long to get back to you. I meant to respond to you yesterday, but got sidetracked by a videogame. :p
No problemo, you have a life too. :) I’ll go back and try what you are saying. At first he was slow and deliberate, but there are places where he zooms along so fast I try to make the keystrokes that appear on the screen, but could not make What he was doing happen.
 

Renzatic

Egg Nog King of the Eastern Seaboard
Posts
3,908
Reaction score
6,840
Location
Dinosaurs
No problemo, you have a life too. :) I’ll go back and try what you are saying. At first he was slow and deliberate, but there are places where he zooms along so fast I try to make the keystrokes that appear on the screen, but could not make What he was doing happen.

Just remember that most everything he does is a combination of a few simple commands. Grab, rotate, scale, extrude, inset, bevel, sometimes with proportional editing on, sometimes not. At certain points, sometimes a subdivision surface modifier is applied.

Once you have a grasp on those bare basics, what you're watching for from that point on is technique.
 

Huntn

Whatwerewe talk'n about?
Site Donor
Posts
5,291
Reaction score
5,235
Location
The Misty Mountains
@Renzatic it’s been a while. After completing 2 of the Blender tutorials, I decided that UE is mostly about landscape at least while in UE, and I decided I was going to hit that hard so I can lay out a setting. So I am on my forth environmental tutorial working on Landscape Materials in a UE sponsored tutorial called Advance Landscape Tools.

The last section I did, the author was talking about taking block meshes from UE, exporting them to blender/Maya I assume to turn them into finished meshes, but then the author starts talking about applying art to these pieces, as in textures, and I’m like what the hell!?, UE is all about environment and fancy materials used to apply textures to meshes.

Am I going crazy? ;) He was talking about applying “art” to meshes while in the tutorial, in Maya it looked like he was applying textures. This just about blew my mind, sure model some nice finished meshes to replace the block meshes, but I’ll be damned if you are going to be putting textures on these items destined for a UE project, aren’t I? ;)

Are materials even compatible between Blender and UE? :unsure:
 
Top Bottom
1 2